Bonding Nym Node
To you unbond your Nym Node means you are leaving Nym network and you will lose all your delegations (permanently). You can join again with the same identity key, however, you will start with no delegations.
Nym Mixnet operators are rewarded for their work every epoch (60 minutes). To prevent centralisation, Nym API is ran by distributed validators on Nyx blockchain.
You are asked to sign a transaction and bond your node to Nyx blockchain so that the Mixnet smart contract is able to map your nym address to your node. This allows us to create a nonce for each account and defend against replay attacks.
Before you bond your nym-node make sure you went through all the previous steps
- Build or download
nym-nodebinary - Configure VPS correctly
- Prepare Nym wallet
- Setup & Run the node
- Configure your node
Do not bond your node to the API if the previous steps weren't finished. Bad connectivity, closed ports, or other poor setup will result in your node getting blacklisted.
Any new bonded node will provide only the bare minimum information: host, identity key and optionally custom port of its HTTP API - we highly recommend to set that one up to 8080. Everything else will be discovered via the self-described API for maximum flexibility. This also includes the sphinx key, meaning if the API is not exposed, the node will be unable to route any traffic.
Every operator has to make sure that their nodes self-described endpoint works, otherwise the node will be un-routable and thus won't get any rewards!
Reveal your menominc phrase only in areas out of surveillance of other people and never share it with others. Nym team will never ask you for your mnemonic phrase - in case you were asked by someone it's a scam, do not reply to it!
Bond via the Desktop wallet (recommended)
You can bond your nym-node via the Desktop wallet. Nym wallet, just like any Nym binary can be downloaded, verified and made executable following these simple steps.
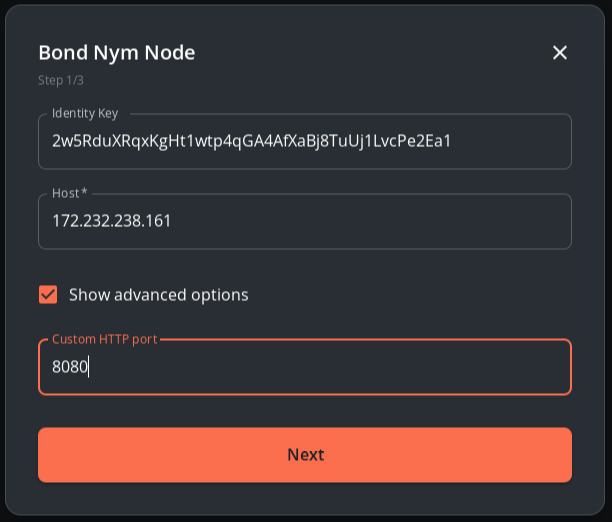
1. Insert bonding information
- Open your wallet, and head to the
Bondingpage and click onBondButton, and input your node details. PressNext. - To find out your
nym-nodedetails, run this command in your VPS:
./nym-node bonding-information --id <ID>- To get a correct host address, run this command in your VPS
echo "$(curl -4 https://ifconfig.me)"2. Bond to correct HTTP port
- In your wallet: Open the box called
Show advanced optionsand make sure that yourCustom HTTP portis set correctly like in yourconfig.toml. We strongly recommend to keep it on default8080. For reference these are the ports used bynym-node:
| Node type | Port name | Correct port value |
|---|---|---|
| Mixnode | Mix port | 1789 |
| Mixnode | Verloc port | 1790 |
| Mixnode | HTTP api port (picture below) | 8080 |
| Gateway (entry & exit) | Mix port | 1789 |
| Gateway (entry & exit) | Client WS API port | 9000 |
- Use own
ID_KEY, andHost, which can be either your IPv4 address or hostname:
3. Enter your values and sign with your node
- Enter the
Amount,Operating costandProfit marginand pressNext
If you are part of Nym Delegation Program (opens in a new tab) or Service Grants Program, make sure your values are within the rules (opens in a new tab) of the programs. Operators setting up larger OP or PM than defined in the rules will be excluded from the program without prior warning!
- You will be asked to run a
signcommand with yournym-node- copy and paste the long signature as the value of--contract-msgand sing it on your VPS:
./nym-node sign --id <ID> --contract-msg <PAYLOAD_GENERATED_BY_THE_WALLET>- Copy the resulting signature string and paste it into the wallet nodal, press
Nextand confirm the transaction:
# This is just an example, copy the one from your process
>>> The base58-encoded signature is:
2bbDJSmSo9r9qdamTNygY297nQTVRyQaxXURuomVcRd7EvG9oEC8uW8fvZZYnDeeC9iWyG9mAbX2K8rWEAxZBro1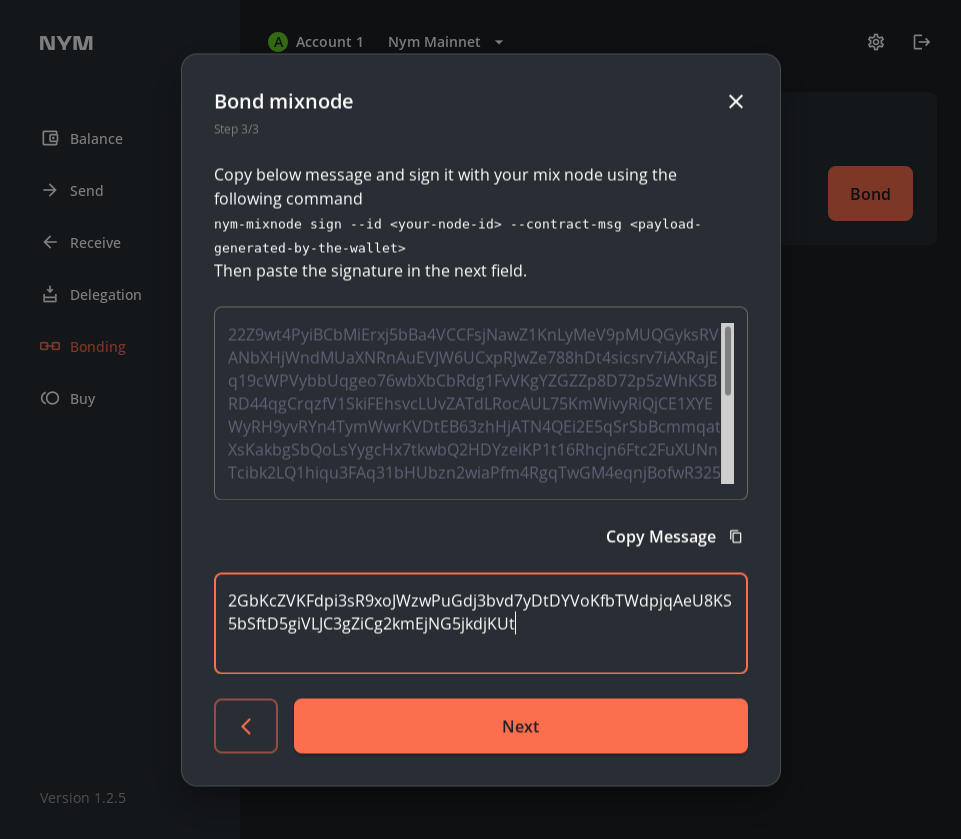
This image is just an example, copy-paste your own base58-encoded signature
Your node will now be bonded and ready to receive traffic, latest at the beginning of the next epoch (at most 1 hour).
If everything worked, you'll see your node running on the either the Sandbox testnet network explorer (opens in a new tab) or the mainnet network explorer (opens in a new tab), depending on which environment you're running.
After migration to nym-node in Mixnet smart contract, many explorers, includyng Nym explorers will not pick up value correctly. While we are working on Nym Explorer v2, we would like to invite operators to use Nym Harbourmaster (opens in a new tab) to track their nodes.
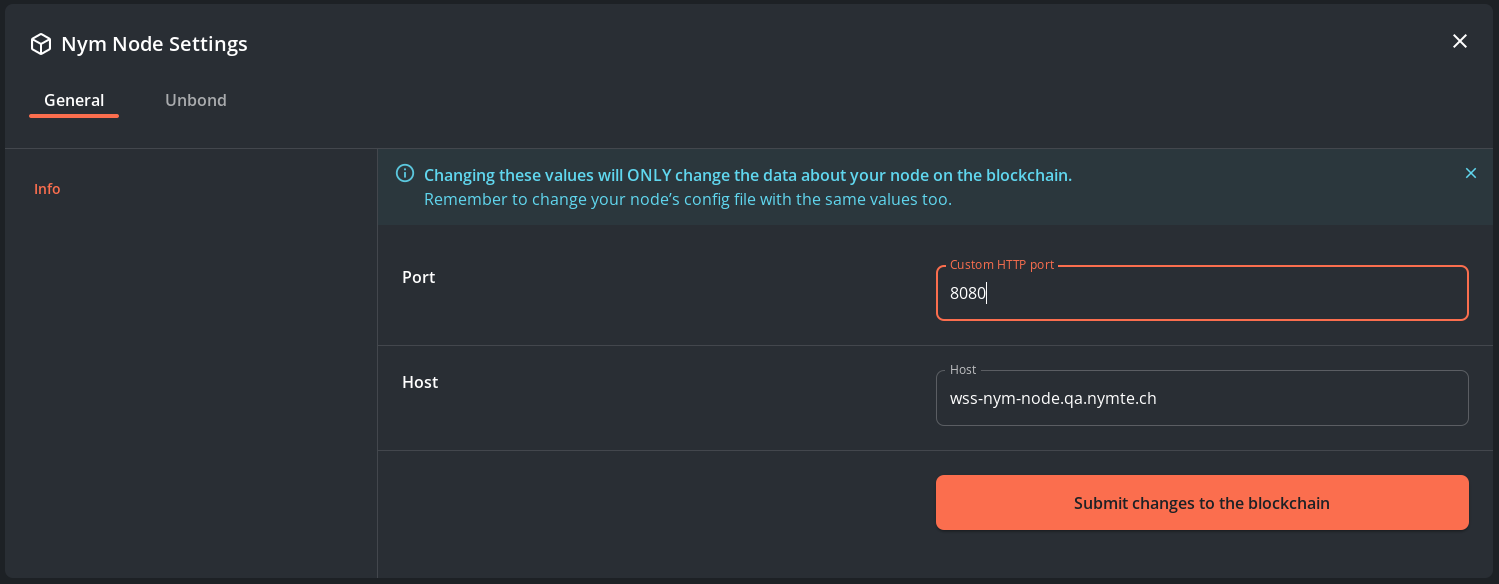
Change Settings via Desktop Wallet
In case you decide to change any settings like custom HTTP port or your host from an IP address to a hostname, don't forget to announce it to the API via changing these values in the desktop wallet.
- Go back to
Bondingpage, click onNym Node Settingsand change the values like in this example:
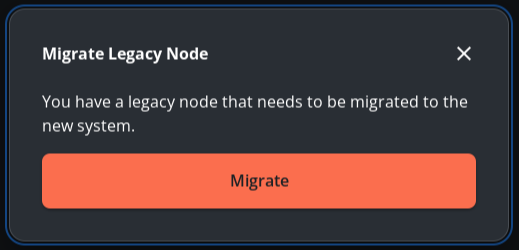
Migrate to nym-node in Mixnet Smart Contract
From nym-wallet version 1.2.15 onward the application allows and prompts operators to migrate their gateway or mixnode to a nym-node in the Mixnet smart contract - an important step in project smoosh. To do so follow these steps:
1. Download the latest wallet from the release page (opens in a new tab), verify and make executable
Nym wallet, just like any Nym binary can be downloaded, verified and made executable following these simple steps.
2. Open the wallet and sign in
3. Migrate!
- Go to Bonding and you will be prompted with such message:
- In case you for some reason didn't see the prompt or you closed it - you can click in the upper right corner of the same window on this button:

- Confirm the transaction
5. Welcome to new episode of nym-node!
Versions older than nym-wallet v 1.2.15 will not allow bonding new nodes.
Bond via the CLI (power users)
If you want to bond your Mix Node via the CLI, then check out the relevant section in the Nym CLI docs.
Fund nym-node Client Nyx Account
This is not relevant for operators running exclusively mixnode functionality. For any type of gateway functionality this is a preparation requirement for the upcoming ticket rewarding.
Every nym-node client contains a mnemonic of a Nyx account, generated with node initialisation (first run command creating all configuration and data files). This mnemonic is located in $HOME/.nym/nym-nodes/<ID>/data/cosmos_mnemonic. This is not the same account as the one used for bonding!
This client account will be used for the process of redemption of zk-nym tickets collected by nodes running as entry-gateway and exit-gateway as the redemption requires gateway to create a multisig proposal on the chain for which the client (node) needs to pay transaction fee.
Giving the low transaction cost on Cosmos, funding your client Nyx account with 25 NYM tokens should be more than enough. To do so, follow these steps:
1. Get your nym-node client Nyx account mnemonic phrase
- Make sure your screen is not exposed to other people or recording devices
- To store sensitive credentials use audited and open source password managers, like KeePassXC (opens in a new tab)
- To print out your node client mnemonic phrase, run:
cat $HOME/.nym/nym-nodes/<ID>/data/cosmos_mnemonic# for example
# cat $HOME/.nym/nym-nodes/default-nym-node/data/cosmos_mnemonic- Alternatively: You can use
scpcommand to copy the filecosmos_mnemonicremotely. If this is your preference, use this command:
scp <USER>@<HOST>:.nym/nym-nodes/<ID>/data/cosmos_mnemonic <LOCAL_TARGET_PATH>- Copy this phrase and save it to your password manager
2. Get the address of your client Nyx account using desktop wallet
- Open desktop wallet and choose to sign in with mnemonic
- Use the phrase from step 1
- Open
Receivetab and copy Nym account address - We recommend operators to store this address for future funding
3. Fund the client Nyx account
- Open wallet with Nym tokens and send a minimum of 25 NYM to the address copied in the previous step
- In case you don't have any spare NYM, you can send tokens from any exchange directly to the address copied in the previous step
Now your nym-node client can use inbuilt Nyx account to create a multisig proposal on chain and redeem user tickets.